Tag Archives: Azure DevOps

Using Azure OpenAI and Logic Apps to Triage Bugs in Azure DevOps

There are other examples out there using the publicly-available OpenAI service, but what if you’re concerned about “pulling a Samsung” and inadvertently sending your company’s IP to the public service when trying to triage a bug report? A simple error message can accidentally provide context about what you’re working on, such as project names, file types, method names, and any other context you intend to use in your prompt.

OpenAI is an AI research lab and company known for their advanced language model GPT-3, while the Azure OpenAI Service is a specific offering within Microsoft Azure that integrates OpenAI’s technologies into the Azure platform, allowing developers to leverage their powerful AI models at scale. Azure OpenAI (AOAI) also helps keep your company’s data in your own Azure tenant.

In my little sample implementation, I used AOAI, a Logic App, and a small Azure Function to put together an “automatic AI bug triage” service hooked up to Azure DevOps. This approach provides a simple way to send problem information to OpenAI for the sake of solving a bug, without training the public OpenAI model.

First, get yourself access to the Azure OpenAI service by requesting it here.

Once you have your service provisioned, you’ll be ready to connect to it from your Azure Function (more on that shortly).

Azure Logic App

The scaffolding for this triage service is the Azure Logic App, which helps orchestrate the capturing of the bug submission, calling the Function, and putting the results back into the bug in Azure DevOps.

Below, you see the first steps of the Logic App. It’s triggered when a bug is created in Azure DevOps (you must specify your org and project for scope, an provide other conditions to trigger if you like), capture the value from the “Repro Steps” field. The value is then “scrubbed” to plain text.

First steps of the Azure Logic App

Next, we call the TriageBug Azure Function and pass it the value of the ‘reprostep’s variable. After capturing the response from the Function in a variable ‘triagetext’, that value is updated into the original bug (work item). In this example, I put it in a custom “AI Triage” field.

Final steps of Azure Logic App

Azure Function to Call Azure Open AI

Now, I could have skipped using a Function and just called the AOAI service directly via its REST endpoint, but why not modularize that a little, providing more development control over prompting (or prompt chaining) to hopefully a more accurate response from the service.

In my Function I used the Microsoft Semantic Kernel, which is a lightweight SDK which provides easy access to AOAI. An easy method to get an IKernal object:

  private static IKernel GetSemanticKernel()
  {
      var kernel = Kernel.Builder.Build();
      kernel.Config.AddAzureTextCompletionService(
          _OpenAIDeploymentName,
          _OpenAIEndpoint,
          _OpenAIKey
      );
      return kernel;
  }

You can, for example purposes, hard code the above ‘_OpenAIDeploymentName’, ‘_OpenAIEndpoint’, and ‘_OpenAIKey’ variables, but it’s recommended you pull those values from Key Vault.

I create a quick static method to call AOAI. I hard-coded the prompt to send to the service, but you could easily extend it to pull a prompt from somewhere else:

        static async Task<string> AskForHelp(string msg)
        {
            IKernel kernel = GetSemanticKernel();

            var prompt = @"As a software developer, identify potential causes, fixes, and recommendations 
for the following error message (include references as well): {{$input}}";

            var fnc = kernel.CreateSemanticFunction(prompt);

            var result = await fnc.InvokeAsync(msg);
            return result.ToString();

        }

The Function trigger was only a small edit from the base code created when using an HTTP trigger:

public static async Task<IActionResult> Run(
    [HttpTrigger(AuthorizationLevel.Function, "get", "post", Route = null)] HttpRequest req,
    ILogger log)
{
    log.LogInformation("TriageBug function processed a request.");

    string message = req.Query["message"];

    string requestBody = await new StreamReader(req.Body).ReadToEndAsync();
    dynamic data = JsonConvert.DeserializeObject(requestBody);
    message ??= data?.message;

    string responseMessage = await AskForHelp(message);

    return new OkObjectResult(responseMessage.Trim());
}

If I have the Logic App enabled and file a bug in ADO, the Logic App runs and I see something like this:

AI triage of bug in ADO

So there you go!

Is it perfect? Nope. There are plenty of things you can adjust/add here to make this more robust, such as:

  • Use more AI to “learn” what best prompt to use (based on extracted text) to get more accurate results.
  • Return the triage text as HTML to enable hyperlinks and better formatting.
  • Uh.. maybe a little error handling? 😀
  • Use more values from ADO (additional bug field values, project name, description, etc) to provide better context for the prompt.

I’m sure there are more. Hopefully this gets you started!

Fixing Link Types in Bulk in Azure Boards (Azure DevOps)

I’ve had a few customers over the years that have needed to bulk change link types in Azure Boards (i.e. change the types of relationship between two work items, but at scale). How does someone get into such a situation?

Several reasons:

  • Performed bulk imports of work items and the work item hierarchy was misconfigured.
  • Performed bulk imports of work items and test cases (to be fair, also work items) which don’t recognize “tested/tested by” link types (only “parent/child”).
  • Someone on the team was incorrectly creating links (maybe creating “related” links instead of “dependent”), and now it’s a pain to undo that.
  • I’m sure there are more.

It’s typically the first or second one – an unexpected result from a work item import (usually from Excel). The import work items function only creates parent/child links, so if you’re trying to import test cases (for example), they won’t be recognized as tests that cover the user stories.

Like this:

Sample spreadsheet for work items to import into ADO.
Sample spreadsheet of work items to be imported into Azure DevOps

If you import this spreadsheet, you get test cases that are “children” of the user stories. Not desirable.

Whatever the reason, misconfigured links in Azure Boards can created unintended experiences (tasks not showing up on task boards, stories not properly rolling up to epics, etc.)

For some organizations, they can just assign someone to walk through all the work items with links that need to be redone, delete the link, and create a new one with the appropriate link type. But that can be incredibly time-consuming. That said, there is a newly released (Q4 2022) feature that allows a user to simply change the link type (rather than delete & re-create), but that’s still a one-by-one process. If you’ve just imported 2000 work items, that could be hundreds of links to change.

Programmatically Changing Link Types

I figured there’s got to be a way to make these bulk changes in a more automated way. So, I dove into the Azure DevOps SDK and wrote a simple console app to accomplish this.

You can see the full example on GitHub here

You effectively set the following values in the config.json file (to be passed as the only argument to the console application):

{
  "orgName": "<org_name>",
  "projectName": "<project name>",
  "sourceWorkItemType": "<source work item type>",
  "targetWorkItemType": "<target work item type>",
  "sourceLinkType": "<link type to look for>",
  "targetLinkType": "<link type to replace with>",
  "personalAccessToken": "<pat>"
}

More on link types: Link types reference guide – Azure Boards | Microsoft Learn

For example, if you specify:

{
  "orgName": "MyKillerOrg",
  "projectName": "My Killer Project",
  "sourceWorkItemType": "User Story",
  "targetWorkItemType": "Test Case",
  "sourceLinkType": "System.LinkTypes.Hierarchy-Forward",
  "targetLinkType": "Microsoft.VSTS.Common.TestedBy-Forward",
  "personalAccessToken": "<your pat here>"
}

This means you want the app to find all user stories that have parent-child links to test cases and change them to have tests/tested by links.

If you know me or have seen my LinkedIn profile, you know I’m not a professional developer – so you don’t get to make fun of my code. But it works on my machine!

You can see the full example on GitHub here.

Let’s take a look at the important parts:

In LinkWorker.cs:

The ProcessWorkItems method connects to Azure DevOps, builds and runs a WIQL query to get the work items.

public List<WorkItem> QueryWorkItems()
        {
            // create a wiql object and build our query
            var wiql = new Wiql()
            {
                Query = "Select [Id] " +
                        "From WorkItems " +
                        "Where [Work Item Type] = '" + sourceWIT + "' " +
                        "And [System.TeamProject] = '" + projectName + "' " +
                        "Order By [Id] Asc",
            };
            // execute the query to get the list of work items in the results
            var result = witClient.QueryByWiqlAsync(wiql).Result;
            var ids = result.WorkItems.Select(item => item.Id).ToArray();

            // get work items for the ids found in query
            return witClient.GetWorkItemsAsync(ids, expand: WorkItemExpand.Relations).Result;
        }

It then finds which of the returned work items have linked items that meet the criteria.

 // loop though work items
            foreach (var wi in workItems)
            {
                Console.WriteLine("{0}: {1}", wi.Id, wi.Fields["System.Title"]);
                targetRelationIndexes = new();
                targetWorkItemIds = new();

                if (wi.Relations != null) 
                {
                    WorkItemRelation rel;
                    for (int i = 0; i < wi.Relations.Count; i++)
                    {
                        rel = wi.Relations[i];
                        if (rel.Rel == sourceLinkType) 
                        {
                            var linkedItem = witClient.GetWorkItemAsync(GetWorkItemIdFromUrl(rel.Url)).Result;
                            if (linkedItem.Fields["System.WorkItemType"].ToString() == targetWIT)
                            {
                                targetRelationIndexes.Add(i);
                                targetWorkItemIds.Add(Convert.ToInt32(linkedItem.Id));
                            }
                        }
                    }
                }
                if (targetRelationIndexes.Count > 0)
                {
                    Console.WriteLine("\tFound {0} links to update.", targetRelationIndexes.Count);
                    // Remove current links
                    BulkRemoveSourceRelationships(Convert.ToInt32(wi.Id), targetRelationIndexes);
                    // Add new links
                    BulkAddTargetLinks(Convert.ToInt32(wi.Id), targetWorkItemIds);
                }
                else
                {
                    Console.WriteLine("\tNo links found to update.");
                }
            }

It’s worth noting that we need to keep a list of link indexes AND work item IDs, as you need the former to remove the existing link (uses the index of the linked relationship for reference) and the latter to create the new link with the desired link type.

For each work item relationship that meets the criteria, BulkRemoveSourceRelationships is called to delete the existing relationship. Subsequently, BulkAddTargetLinks creates a new relationship between the 2 work items with the specified (correct) link type. Each method uses the PatchDocument approach.

WorkItem BulkRemoveSourceRelationships(int sourceId, List<int> indexes)
        {
            JsonPatchDocument patchDocument = new JsonPatchDocument();
            foreach (int index in indexes)
            {
                patchDocument.Add(
                    new JsonPatchOperation()
                    {
                        Operation = Operation.Remove,
                        Path = string.Format("/relations/{0}", index)
                    }
                );
            }
            return witClient.UpdateWorkItemAsync(patchDocument, sourceId).Result;
        }
 WorkItem BulkAddTargetLinks(int sourceId, List<int> targetIds)
        {
            WorkItem targetItem;
            JsonPatchDocument patchDocument = new JsonPatchDocument();
            foreach (int id in targetIds)
            {
                targetItem = witClient.GetWorkItemAsync(id).Result;
                patchDocument.Add(
                   new JsonPatchOperation()
                   {
                       Operation = Operation.Add,
                       Path = "/relations/-",
                       Value = new
                       {
                           rel = targetLinkType,
                           url = targetItem.Url,
                           attributes = new
                           {
                               comment = "Making a new link for tested/tested by"
                           }
                       }
                   }
                );
            }
            return witClient.UpdateWorkItemAsync(patchDocument, sourceId).Result;
        }

That’s really about it. In my test against roughly 100 work items, it took about 15 seconds to run.

Again you can see the full (SAMPLE) code in the GitHub repo (yes, it’s called GoofyLittleLinkChanger).

Questions? Thoughts? Thanks for reading!

Migrating from TFS (or ADO Server) to Azure DevOps

So you have Team Foundation Server or Azure DevOps Server (the new name for TFS as of 2019-ish) and you’ve decided to get that thing up to Azure (specifically, Azure DevOps Services). Great! Now what? This post will walk you through the most common options and approaches and provide some gotchas along the way.

(For the sake of being concise, I’m going to refer to the on-premises instance as “TFS”. But know that this is interchangeable with ADO Server. Azure DevOps Services (the cloud-hosted version) will be referred to as “ADO”.)

TFS & ADO – What’s the Difference?

First, it’s important to understand the main differences between TFS and ADO. This Learn article goes into plenty more detail, but the key differences are:

FeatureTFSADO
Server ManagementYou manageMicrosoft manages
ExpendituresCapital (servers, licenses)Operational (subscriptions)
AuthenticationWindows Authentication/Active DirectoryMicrosoft Account or Azure Active Directory (highly recommended)
ReportingSQL Server Analysis ServicesAnalytics Service
Basic differences between TFS and ADO

There are differences in nomenclature as well. For example, in TFS the root container of projects (of a single deployment) is a Project Collection. In ADO, it’s an organization.

Migration – An Honest Discussion

When migrating to ADO, most people automatically look to move everything they have in TFS into ADO. We always recommend having a heart-to-heart with your teams to see if that’s actually necessary. I bet you have some old projects in there that aren’t used anymore, or branches of code that need to die on the vine. Do you absolutely need to bring over all that dead weight into your new environment? What you decide to do will impact your migration approach.

Weighing your Migration Options

There are several approaches to migrating from TFS to ADO. Let’s walk through the main ones (FYI, the first 3 options discussed here are also covered in MS Learn documentation):

Start Fresh

Maybe you don’t need to bring everything you’ve ever put into TFS to ADO. If you are fine with cutting over with your most important assets from TFS and are willing to abandon a decent amount of history (and baggage), manually importing stuff is your best route.

Typically, the most common assets to keep are source code (and even then, not all history, but either current revisions or key labeled code). Pipelines (esp. if not YAML-based), test plans, etc. are more difficult to migrate.

This is by far the easiest approach, but the lowest fidelity.

Use the Migration Tool

Let’s say you decide your team needs to bring over as much as possible, including history of source code, work items, etc.

Microsoft provides a high-fidelity migration tool to help here. All the nitty-gritty details about the migration tooling and surrounding process are documented in this migration guide.

The migration guide goes over all the details, but here are the key limitations and conditions you need to be aware of:

  • Your version of TFS needs to be within 2 releases (minor releases) of the current version. This means you definitely need to be on Azure DevOps Server. As of this writing, you need to be on Azure DevOps Server 2020.1.1 or later. If you’re behind, you’ll need to upgrade your on-premises installation first. This documentation is updated to reflect what version you need to have in order to get support in using the migration tool.
  • If you’re not already using it, you’ll need to get your identities migrated or synchronized with Azure Active Directory.
  • The migration tool will only migrate/import data into a new, empty ADO organization. You can’t use this tool to consolidate orgs or deployments.
  • If your existing backend SQL database is too big, the migration tool will direct you to use an alternate method to bring in your database (TLDR it involves setting up a SQL Azure VM & importing that way).
  • There are a few items that the migration tool will NOT import:
    • Extensions
    • Services hooks
    • Load test data
    • Mentions
    • Project Server Integrations (doesn’t exist for ADO)

Again, the migration guide (https://aka.ms/AzureDevOpsImport) is your friend.

Go the API Route

This approach sits in between “Start Fresh” and “Migrate” in terms of fidelity. You can utilize the Azure DevOps APIs to roll your own migration utility, or leverage some 3rd party options (such as OpsHub or TaskTop).

This option also carries its pros and cons. It’s more work for you, but you get more control. A 3rd party route will carry a cost.

Get Help

Microsoft has a terrific partner ecosystem that can be called upon to help you with migration as well. They have a ton of experience with the approaches I called out above, and some may have their own tooling or methods as well. If you’d like help connecting to one of those partners, reach out to your Microsoft contact (or ping me if you’re not sure who that is).

Wrapping Up

I hope you find this helpful when considering your move from TFS (or ADO Server) to Azure DevOps Services. If you have other tools you are thinking about migrating from, there may be options for those as well: but that’s for another blog post in the future.

Have a look at the below links for additional information on this topic.

Managing PII & PHI in Azure DevOps

Summary

As teams expand and deepen usage of Azure DevOps, there is the propensity for Personally Identifiable Information (PII) being introduced into work items (user stories, bugs, test cases, etc.). This can introduce liability and privacy issues for organizations. PII can creep in into Azure DevOps environments in the form of (may not be all inclusive):

  • Field values in user stories, bugs, tasks, etc. (description, acceptance criteria, title, and other HTML or text fields)
  • Test cases (title, description, test step descriptions, test step attachments)
  • Attachments to any work item type

While there is not an off-the-shelf solution to help with this There are ways to leverage Azure to develop such a utility to find, manage, and notify appropriately when PII exists in the Azure DevOps organization.

Approaches to Scanning

There are two main approaches to this problem. First, the team needs to find any PII that already exists in Azure DevOps and take necessary action. Second, the team needs a method to detect PII as close to real-time when it is first introduced.

Full Scan of Azure DevOps

To “catch up” and detect with PII that already exists in Azure DevOps, a comprehensive scan of Azure DevOps content is needed.

Below is a very high-level pseudo-code outline of performing such a scan. This scan takes into consideration all the aforementioned areas that PII could be present in Azure Boards or Azure Test Plans (the components Azure DevOps that leverage work items).

I also built a sample (just a sample, only a sample) here in GitHub.

Connect to Azure DevOps organization
Foreach (project in organization)
{
	Foreach (workItemType in project)
{
	Get all work items for the current workItemType
	Foreach (workItem in workItemsByType)
{
	Get all HTML and text field values that could contain PII
	Send HTML/text field values to Azure Text Analytics (in batch document)
	Foreach (valueWithPII in TextAnalyticsResults)
{
	Take some action (notification, redaction, removal)
}
Get attachments for the workItem
Foreach (attachment in workItemAttachments)
{
	Send attachment content (supported format) to Azure Computer Vision
	Send computerVisionResults to Azure Text Analytics
	Foreach (attachmentWithPII in AttachmentAnalyticsResults)
	{
		Take some action (notification, removal)
	}
}
If (workItemType is a Test Case)
{
	Get all values of each test step
Send test step values to Azure Text Analytics (in batch document)
Foreach (testStepWithPII in TestStepAnalyticsResults)
{
	Take some action (notification, redaction, removal)
}
Foreach (attachment in TestSteps)
{
	Send attachment content (supported format) to Azure Computer Vision
	Send computerVisionResults to Azure Text Analytics
	Foreach (attachmentWithPII in AttachmentAnalyticsResults)
	{
		Take some action (notification, removal)
	}

}
Get any test case parameters
Send test case parameters to Azure Text Analytics (in batch document)
Foreach (paramWithPII in TestParametersAnalyticsResults)
{
	Take some action (notification, removal)
}
}
}
}
}

This solution could also be used for a periodic scan if real-time/triggered scans are prohibitive.

Reference Documentation

Incremental or Triggered Scan

Moving forward, teams will need to detect the introduction of PII into Azure DevOps as soon as possible. There are a couple of approaches to this more incremental or trigger-based scan.

First, the solution developed in “Full Scan of Azure DevOps” could be utilized here as well, parameterized to check only the most recent items for a given interval. For example, if the scan is to run every hour, filter work item querying to return only items with a ChangedDate in the last 60 minutes.

Second, Azure Logic Apps could be used to trigger when work items are updated in Azure DevOps, providing detection within 1 minute of PII introduction. The Logic App would orchestrate the extraction of content to check, as well as any mitigation actions.

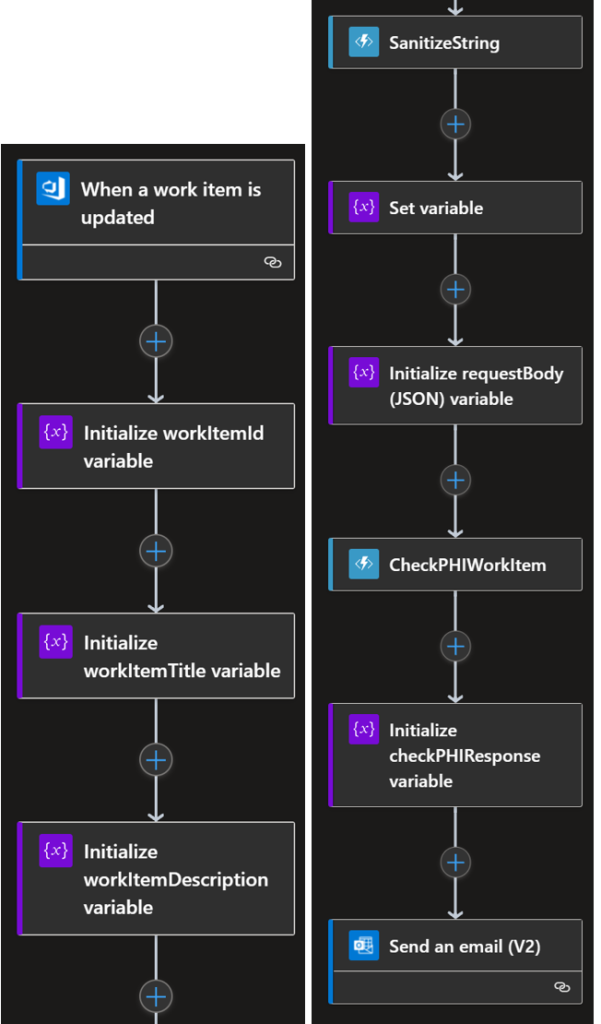
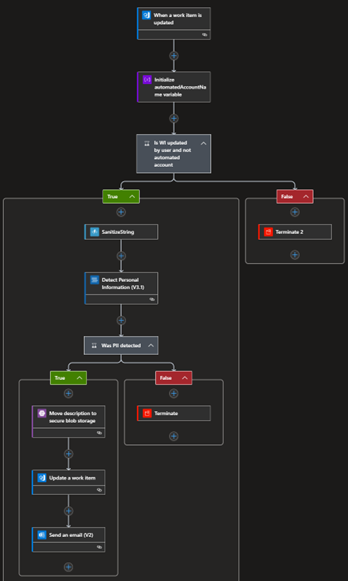
Below are a couple screenshots of basic examples of using a Logic App (steps are simplified for brevity).

Detect and Notify   This first example simply checks the description field of a work item for PII, using two Azure Functions (SanitizeString to remove HTML markup, and CheckPHIWorkItem to receive the text to check, call Azure Text Analytics, and format a response).   It is triggered by an update to a work item. When complete, it sends an email to the person who updated the work item.
Detect, Mitigate, and Notify   This second example avoids using Azure Functions for Text Analytics by using the built-in connector for Text Analytics.   It is triggered by an update to a work item. If the work item was updated by a human user, the Text Analytics connector is called. If PII is detected, the PII is copied to a file in Azure Blob Storage (where more RBAC controls are present), and either the redacted text or a violation notice is updated back into the work item.   When complete, it sends an email to the person who updated the work item.  

While there are Logic App connectors for Azure DevOps, Text Analytics, and Computer Vision, Azure Functions would provide more granular control (and also become more of a microservices architecture). Create Azure Functions to:

  • “Sanitize” HTML field values to plain text
  • Manage collation and interaction with Azure Text Analytics for text values
  • Manage OCR actions using Azure Computer Vision to extract text values from images and other attachments
  • Conduct PII replacement, redaction, or removal
  • Facilitate logging (to Azure storage, databases, or Azure Event Hubs)

Lastly, the “Full Scan” solution could be combined with the Azure Functions/microservices-style architecture to create more reusable components, allowing for easier updates, fixes, and scale. For example, create Functions for each of the above-bulleted capabilities, and leverage those Functions from the “Full Scan” solution as well as the “Incremental Scan” solution.

Azure Services Used

Below are Azure services that could potentially be used for this solution and are referenced in this document.

  • Azure Cognitive Services: Azure Cognitive Services are cloud-based services with REST APIs and client library SDKs available to help you build cognitive intelligence into your applications. You can add cognitive features to your applications without having artificial intelligence (AI) or data science skills. Azure Cognitive Services comprise various AI services that enable you to build cognitive solutions that can see, hear, speak, understand, and even make decisions.
    • Text Analytics: The Text Analytics API is a cloud-based service that provides Natural Language Processing (NLP) features for text mining and text analysis, including: sentiment analysis, opinion mining, key phrase extraction, language detection, and named entity recognition.
    • Computer Vision: The cloud-based Computer Vision API provides developers with access to advanced algorithms for processing images and returning information. By uploading an image or specifying an image URL, Microsoft Computer Vision algorithms can analyze visual content in different ways based on inputs and user choices. Learn how to analyze visual content in different ways with quickstarts, tutorials, and samples.
  • Azure Logic Apps: Azure Logic Apps is a cloud-based platform for creating and running automated workflows that integrate your apps, data, services, and systems.
  • Azure Functions: Azure Functions is a serverless solution that allows you to write less code, maintain less infrastructure, and save on costs. Instead of worrying about deploying and maintaining servers, the cloud infrastructure provides all the up-to-date resources needed to keep your applications running. You focus on the pieces of code that matter most to you, and Azure Functions handles the rest.
  • Azure Blob Storage: Azure Blob storage is Microsoft’s object storage solution for the cloud. Blob storage is optimized for storing massive amounts of unstructured data.
  • Azure Event Hubs: Azure Event Hubs is a big data streaming platform and event ingestion service. It can receive and process millions of events per second. Data sent to an event hub can be transformed and stored by using any real-time analytics provider or batching/storage adapters.

Development Considerations

While the conceptual approach to scanning Azure DevOps is straightforward, there are programming considerations to discuss if wanting to complete a comprehensive scan of Azure DevOps work items. These are a few that I discovered during my research.

  • Dealing with attachments: Checking for PII in an attachment requires additional steps, depending on the file format.
    • Text-based (.txt, .json, .xml, .html, etc.): These can have their content streamed to memory as text. The Text Analytics API can then be streamed the content.
    • Binary (.jpg, .doc, .pdf, .png, etc.): If the format is a supported one for the Read API, the URL of the attachment can be provided to the Read API directly (if the identity used to run the Cognitive Services resource has access to Azure DevOps) using the attachment URL. Otherwise, these attachments will need to be downloaded as well. Depending on the file type, additional methods will need to be used to get the content into an accepted file format for the OCR features in Azure Computer Vision (using the Read API).
      • The Read API has the following input requirements:
        • Supported file formats: JPEG, PNG, BMP, PDF, and TIFF
        • For PDF and TIFF files, up to 2000 pages (only first two pages for the free tier) are processed.
        • The file size must be less than 50 MB (6 MB for the free tier) and dimensions at least 50 x 50 pixels and at most 10000 x 10000 pixels.
  • As documented in the pseudo-code for the full scan approach, an additional check and loop is needed to iterate test steps in a Test Case. For any attachments on a test step, the above “dealing with attachments” considerations also apply.
  • An individual Logic Apps can only be triggered by changes to a single project (the trigger action can be bound to only one Azure DevOps project).
  • Work Items: API limits work item query results to 200.
    • May need to build narrower queries, such as iteratively “walk back” by querying for items in last 1 day, then 2 days, etc. (for example)
    • OData feeds support more than 200 results, but don’t include text-based fields. Additional calls would have to be incorporated.

Actions Upon Detection

Regardless of the approach used to detect PII, the actions taken upon detection are most important. What to do depends on urgency, compliance, and trust.

Logging

Simply logging the detection may be good enough if proper reporting is all that is needed. Sending the detection event to Azure Event Hubs or Azure Event Grid provides an avenue for the event to be recorded in an analytics workspace, or analysis engine.

Notification

Notification can involve several methods:

  • Email to the user introducing the PII, that person’s manager, or a compliance team.
  • Post a message to Microsoft Teams.
  • Place a tag on the work item to draw attention to it.

Mitigation

Mitigation involves taking direct action on the PII content. During this exercise, several options presented themselves. For example, if the following text was detected in the description field of a work item:

Parker Doe has repaid all of their loans as of 2020-04-25. Their SSN is 859-98-0987. To contact them, use their phone number 800-102-1100.

  • PII deletion: Delete the PII content and save the work item.
  • PII redaction: The content can be replaced with its redacted equivalent (Azure Text Analytics provides redaction automatically): ********** has repaid all of their loans as of **********. Their SSN is ***********. To contact them, use their phone number ************.
  • Secure the PII: Move the PII content to a location that has proper RBAC, such as Azure Blob Storage. Replace the description field with a notice of the PII detection and the blob URL. Only those with RBAC access will be able to view it.

Associated Costs

Specific costs of this solution depend heavily on overall volume: Frequency of execution, API calls, # of records checked, etc. Below is reference pricing for each service that could be utilized.

Logic Apps

Pricing page

  • Price Per Execution: $0.000025 (First 4,000 actions free)
  • Standard Connector: $0.000125 (Azure DevOps, Text Analytics)

Text Analytics

Pricing page

  • 0-500,000 text records — $1 per 1,000 text records
  • 0.5M-2.5M text records — $0.75 per 1,000 text records
  • 2.5M-10.0M text records — $0.30 per 1,000 text records
  • 10M+ text records — $0.25 per 1,000 text records

Text record: request up to 1,000 characters

Computer Vision

Pricing page

  • OCR pricing table
    • 0-1M transactions — $1 per 1,000 transactions
    • 1M-10M transactions — $0.65 per 1,000 transactions
    • 10M-100M transactions — $0.60 per 1,000 transactions
    • 100M+ transactions — $0.40 per 1,000 transactions

Disclaimer

The information in this document is designed to be a sample reference for the solution described. It does not imply an enterprise-ready solution architecture, nor represent a commitment to fully design and build the described solution.

Azure DevOps Licensing Primer

Licensing Azure DevOps shouldn’t be scary. Let me break it down for you.

Licensing Azure DevOps shouldn’t be scary. Let me break it down for you.

Azure DevOps Services (cloud)

Don’t overthink how to license & pay for Azure DevOps. It’s more straightforward than you think, for 2 reasons:

  1. Costs you see on the Azure Pricing Calculator are all you need to worry about. Azure DevOps doesn’t charge additional fees under the covers such as Azure Storage, database, etc. WYSIWYG, basically.
  2. Did you over- or under- purchase? Azure DevOps is billed via an Azure Subscription monthly, which means you can dial up and down what you need from Azure DevOps each month.

For Azure DevOps Services (i.e. cloud-hosted), user licensing is pretty straightforward:

  • Basic: $6/user/month
  • Basic + Test Plans: $52/user/month

A few considerations which can reduce overall monthly cost:

  • Azure DevOps Services comes with 5 free Basic users included.
  • A Visual Studio Professional subscription includes a Basic license for no additional cost.
  • A Visual Studio Enterprise subscription includes a Basic + Test Plan license for no additional cost.
  • An MSDN Platforms subscription includes a Basic + Test Plan license for no additional cost.
  • A Visual Studio Test Professional subscription includes a Basic + Test Plan license for no additional cost.
  • Stakeholder users (comparison 1/2 down this page) are free.

Note: Azure DevOps Basic User licenses grant rights to use both Azure DevOps Services (cloud-hosted) AND Azure DevOps Server (on-prem). Azure DevOps Server (on-prem) CALs grant rights to Azure DevOps Server (on-prem) only.

Other components of Azure DevOps

  • Azure Pipelines – includes 1 Microsoft-hosted agent and 1 self-hosted agent. (How to choose)
    • Each additional Microsoft-hosted agent/pipeline: $40/month
    • Each additional self-hosted agent/pipeline: $15/month
  • Azure Artifacts – First 2 GB free, then progressive pricing based on usage:
    • 0 – 2 GB = Free
    • 2 – 10 GB = $2 per GB
    • 10 – 100 GB = $1 per GB
    • 100 – 1,000 GB = $0.50 per GB
    • 1,000+ GB = $0.25 per GB

(You can also set Azure Artifacts to limit your feeds to 2GiB to prevent any charges)

Pricing page: https://azure.microsoft.com/en-us/pricing/details/devops/azure-devops-services/

Azure DevOps Server (on-premises)

For Azure DevOps Server (on-premises), there is a server license, but is included with any active Visual Studio subscription (so doubtful you’d need to purchase one individually). Any active Visual Studio subscription includes both a server license and a client access license (CAL) for Azure DevOps Server.

More information: